Hey there, fellow artist! If you’re looking to learn how to draw a Christmas tree, you’ve come to the right place. Whether you’re a seasoned pro or just starting out, this guide will walk you through every step of creating your very own festive masterpiece. So grab your pencils, some paper, and let’s dive into the world of holiday cheer!
Drawing a Christmas tree might seem like a simple task, but there’s a lot more to it than just making a triangle with a star on top. From the shape and proportions to adding those little details that make it pop, we’ll cover everything you need to know. And don’t worry if you’re not perfect at first—practice makes perfect, right?
Before we get started, let me tell you something cool. Learning how to draw a Christmas tree isn’t just about creating art; it’s also about tapping into your creativity and having fun. Who knows? You might even surprise yourself with how awesome your tree turns out. So let’s jump right in and make this holiday season extra special!
- Peluqueria Cerca De Mi Your Ultimate Guide To Finding The Best Hair Salon Near You
- Dont Call Me Stepmom A Modern Perspective On Blended Families
Why Learning How to Draw a Christmas Tree Matters
Now, you might be thinking, “Why bother learning how to draw a Christmas tree?” Well, my friend, it’s more than just a fun activity. Drawing a Christmas tree is a great way to express yourself, celebrate the holidays, and even bond with family and friends. Plus, it’s a skill you can use for all sorts of things—cards, decorations, or even just doodling during those long meetings.
Here’s the thing: drawing isn’t just for “artists.” It’s for anyone who wants to explore their creativity. And when it comes to Christmas trees, there’s no right or wrong way to do it. You can make it as simple or as elaborate as you want. The key is to enjoy the process and let your imagination run wild.
What You’ll Need to Get Started
Alright, let’s talk tools. To start drawing your Christmas tree, you’ll need a few basic supplies. Don’t worry, you don’t need anything fancy. Here’s a quick list:
- Just Give Me My Money Prank Tiktok The Ultimate Guide To Viral Fun
- Feliz Dia De Las Madres Celebrating The Heart Of The Family
- Pencil (preferably a HB or 2B for sketching)
- Eraser (a soft one so you don’t smudge your paper)
- Paper (regular printer paper works fine)
- Markers or colored pencils (optional, but great for adding color)
- Sharpener (because dull pencils are no fun)
Got everything? Good. Now let’s move on to the fun part!
Step 1: Sketching the Basic Shape
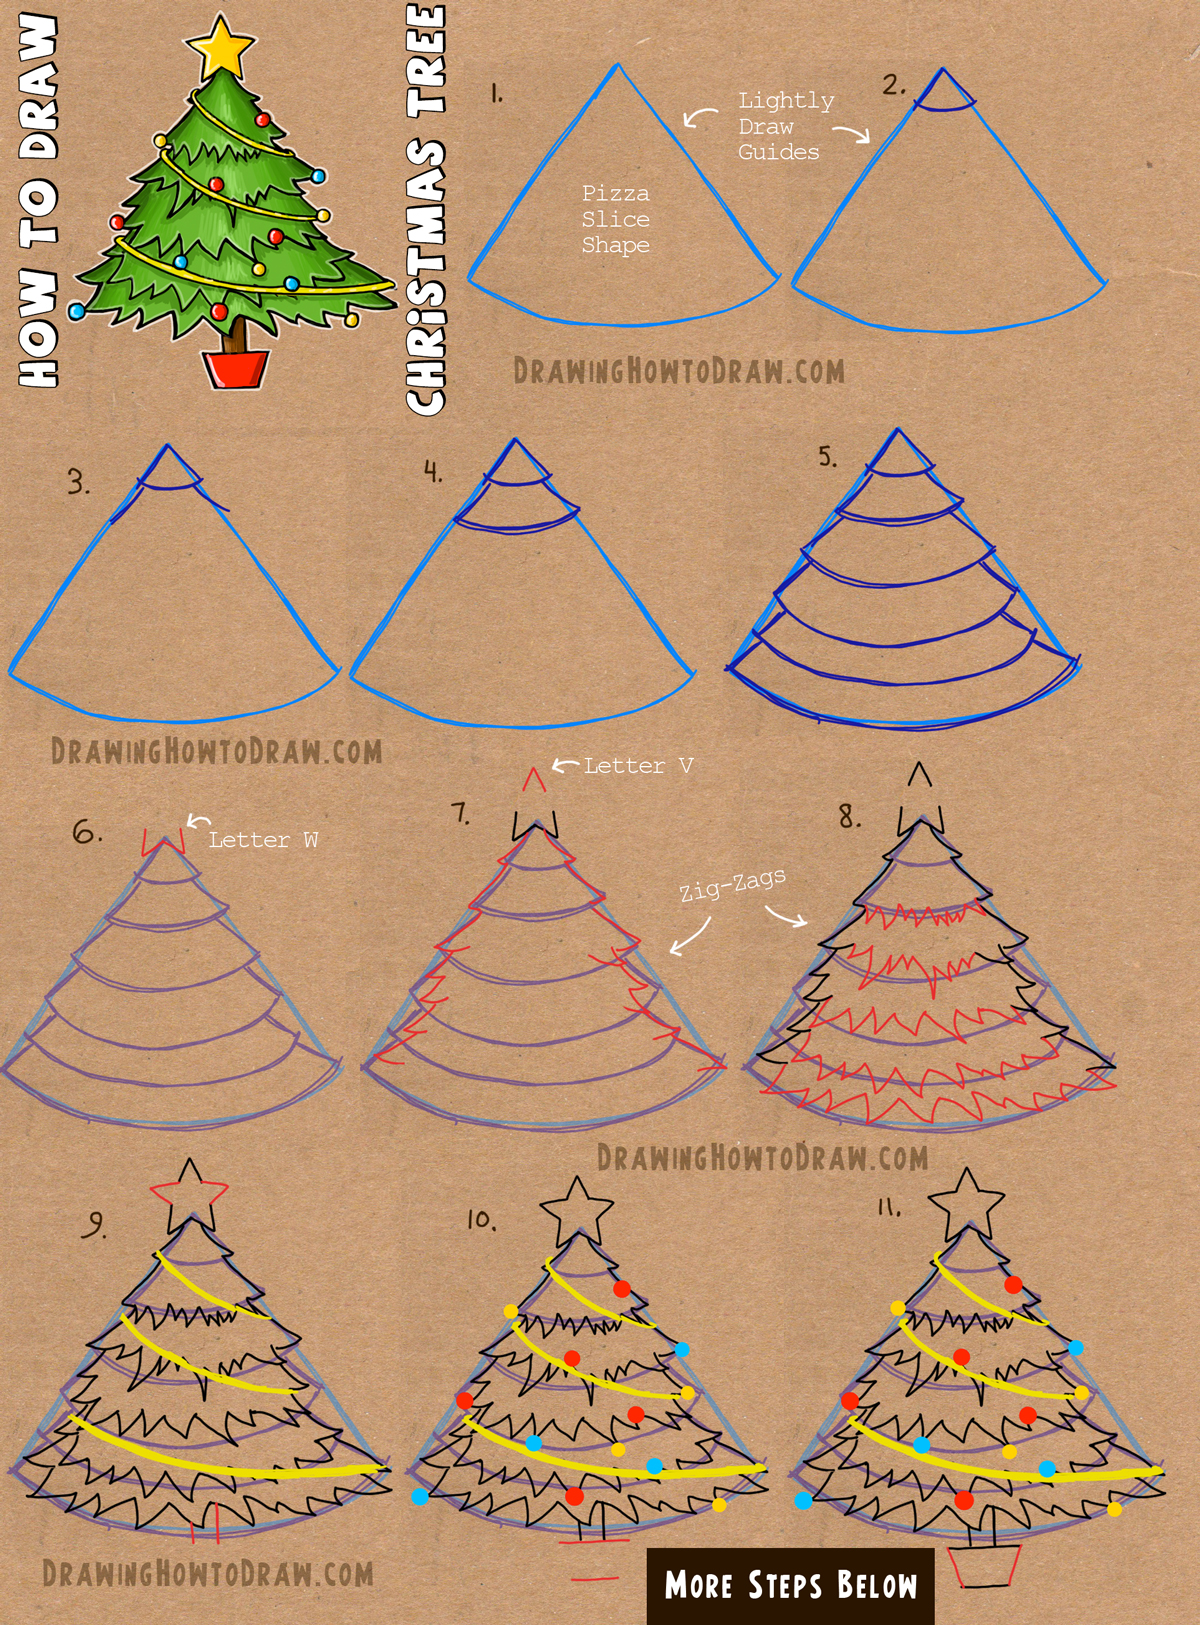
The first step in learning how to draw a Christmas tree is sketching out the basic shape. Think of it like building a foundation for your masterpiece. Start by drawing a large triangle. Don’t worry if it’s not perfect—Christmas trees come in all shapes and sizes. Just focus on getting the general outline down.
Here’s a tip: if you’re struggling with the triangle, try breaking it down into smaller shapes. Draw a straight line down the middle, then add two slanted lines on either side. Once you’ve got the triangle in place, you can refine the edges to make it look more natural.
Tips for Perfecting Your Triangle
Now, I know what you’re thinking: “How do I make my triangle look less… triangular?” Great question! Here are a few tips to help you create a more realistic tree shape:
- Make the edges slightly curved instead of perfectly straight.
- Add a few random bumps to mimic the natural shape of tree branches.
- Don’t make the triangle too pointy at the top—leave a little room for your star or angel.
Remember, the goal isn’t perfection—it’s fun. So don’t stress too much about getting every line just right. Your tree will still look amazing, even if it’s a little wonky.
Step 2: Adding the Trunk
Once you’ve got your triangle in place, it’s time to add the trunk. This is where your Christmas tree really starts to take shape. Draw a vertical rectangle at the bottom of your triangle. Again, don’t worry about making it perfect—just focus on getting the general idea down.
Here’s another tip: try making the trunk a little wider at the bottom and narrower at the top. This will give it a more natural look. You can also add some texture by drawing a few lines or bumps to make it look like bark. Just keep it simple—less is more when it comes to details.
Why the Trunk Matters
You might be wondering why the trunk is such a big deal. Well, it’s not just there to hold up your tree—it’s also a key part of the overall design. A well-drawn trunk can add depth and dimension to your drawing, making it look more realistic and polished. Plus, it’s a great place to add those little details that make your tree stand out.
Step 3: Adding Details to Your Tree
Now that you’ve got the basic shape and trunk in place, it’s time to add some details. This is where the fun really starts! You can add all sorts of things to your tree, from ornaments to lights to snowflakes. The possibilities are endless.
Here are a few ideas to get you started:
- Draw small circles or ovals for ornaments.
- Add little lines or dots to represent lights.
- Sketch some snowflakes at the top of the tree for a winter wonderland feel.
- Include a star or angel at the very top for that classic Christmas touch.
Remember, this is your tree—so feel free to add whatever details you like. There’s no wrong way to decorate your masterpiece!
How to Add Shadows and Highlights
If you want to take your drawing to the next level, try adding some shadows and highlights. This will give your tree more depth and make it look even more realistic. Here’s how to do it:
- Use a darker pencil or marker to add shadows on one side of the tree.
- Leave some areas lighter to create highlights.
- Be gentle with your shading—too much can make your drawing look messy.
Shading might seem tricky at first, but with a little practice, you’ll get the hang of it. And trust me, it’s worth it—the results are totally worth the effort.
Step 4: Coloring Your Christmas Tree
Now that you’ve got the basic shape and details in place, it’s time to bring your tree to life with color. This is where you can really let your creativity shine. Whether you’re using colored pencils, markers, or even watercolors, there are endless possibilities for bringing your tree to life.
Here’s a quick guide to coloring your Christmas tree:
- Start with the main color of your tree—usually green, but feel free to experiment!
- Add colors to your ornaments and lights—red, gold, silver, blue, and purple are all great options.
- Use a lighter shade for highlights and a darker shade for shadows.
- Don’t forget to color your trunk—brown or gray works well, but you can get creative here too.
Coloring is all about having fun, so don’t be afraid to try new things. Your tree will look amazing no matter what colors you choose.
Choosing the Right Colors
Picking the right colors for your Christmas tree can be a bit overwhelming, especially if you’re new to coloring. Here’s a quick tip: stick to a color palette that complements the holiday season. Think greens, reds, golds, and silvers. But if you want to go wild, go for it—there’s no rule that says your tree has to look traditional.
Step 5: Final Touches
Almost there! The final step in learning how to draw a Christmas tree is adding those last-minute touches that make it truly special. Take a step back and look at your drawing. Are there any areas that need a little extra attention? Maybe you want to add more ornaments, or maybe you want to tweak the shading. Whatever it is, now’s the time to make those final adjustments.
Here’s a quick checklist to help you with your final touches:
- Double-check your lines—are they clean and crisp?
- Look at your colors—are they vibrant and eye-catching?
- Check your details—are they well-defined and balanced?
Once you’re happy with your tree, give yourself a pat on the back—you did it! You’ve just created your very own Christmas masterpiece.
Why Final Touches Are Important
You might be wondering why final touches are such a big deal. Well, they’re the difference between a good drawing and a great one. Those little details can elevate your artwork and make it stand out. Plus, they give you a chance to refine your skills and make sure everything looks just right.
Common Mistakes to Avoid
As with any new skill, there are a few common mistakes to watch out for when learning how to draw a Christmas tree. Here are a few to keep in mind:
- Don’t make your tree too symmetrical—real trees are naturally a bit uneven.
- Be careful not to overcrowd your tree with too many details—it can make it look messy.
- Don’t forget to add a trunk—it’s an important part of the overall design.
Remember, mistakes are just opportunities to learn. So don’t sweat it if something doesn’t turn out exactly as planned. Every artist has their own unique style, and yours will only get better with practice.
Conclusion
And there you have it—a complete guide to learning how to draw a Christmas tree. From sketching the basic shape to adding those final touches, you’ve now got all the tools you need to create your very own festive masterpiece. So go ahead and show off your skills—share your drawing with friends and family, or even post it online to inspire others.
But don’t stop here! Keep practicing, keep experimenting, and most importantly, keep having fun. Who knows? You might just discover a new passion for drawing. And if you’re looking for more holiday-themed art projects, be sure to check out our other guides. Happy drawing, and merry Christmas!
Table of Contents
- Why Learning How to Draw a Christmas Tree Matters
- What You’ll Need to Get Started
- Step 1: Sketching the Basic Shape
- Tips for Perfecting Your Triangle
- Step 2: Adding the Trunk
- Why the Trunk Matters
- Step 3: Adding Details to Your Tree
- How to Add Shadows and Highlights
- Step 4: Coloring Your Christmas Tree
- Choosing the Right Colors
- Step 5: Final Touches
- Why Final Touches Are Important
- Common Mistakes to Avoid

Detail Author:
- Name : Stacey Bednar
- Username : mbailey
- Email : upollich@hotmail.com
- Birthdate : 1995-01-04
- Address : 81421 Tromp Brook Suite 746 O'Connellfurt, TX 36797
- Phone : 1-925-576-5371
- Company : Blanda, Bradtke and McLaughlin
- Job : Dental Assistant
- Bio : Quia qui id dignissimos aliquid iste. Nisi aspernatur quos et facere. Neque neque qui quo autem fuga. Et quibusdam architecto molestias.
Socials
instagram:
- url : https://instagram.com/emmet_official
- username : emmet_official
- bio : Excepturi nam omnis velit voluptatem. Fugit id esse ex consequatur. Ipsum illo unde voluptatem.
- followers : 172
- following : 1632
facebook:
- url : https://facebook.com/ereynolds
- username : ereynolds
- bio : Est occaecati dolorem veritatis.
- followers : 2742
- following : 997
tiktok:
- url : https://tiktok.com/@emmet_official
- username : emmet_official
- bio : Quis assumenda beatae consequuntur necessitatibus. Est eligendi quia a autem.
- followers : 6945
- following : 1006
twitter:
- url : https://twitter.com/emmet_reynolds
- username : emmet_reynolds
- bio : Sunt quibusdam tenetur optio nam qui. Perspiciatis amet ut maxime unde sit quasi. Quisquam soluta mollitia dolores voluptatem quam earum perferendis.
- followers : 1998
- following : 289
