Gift wrapping is an art form that can turn a simple present into something truly special. You’ve probably been there—staring at a roll of wrapping paper, wondering how to make your gift look as good as the ones in the store. Well, worry no more! Whether you’re wrapping a birthday present, Christmas gift, or just surprising someone with a thoughtful gesture, this guide will teach you everything you need to know about how to wrap a present like a pro. So grab your scissors, tape, and some creativity, and let’s dive in!
Let’s be real, gift wrapping doesn’t have to be stressful. In fact, it can be super fun if you know the right techniques. From choosing the perfect paper to adding those finishing touches, we’re going to break down every step so even beginners can master the art of wrapping. And hey, who doesn’t love unwrapping a beautifully wrapped present?
This guide isn’t just about wrapping; it’s about making your gift memorable. We’ll cover everything from basic methods to advanced tips, ensuring your gifts look amazing every single time. So stick around, because by the end of this, you’ll be wrapping presents like a seasoned pro!
- Mike Tyson Vs Jake Paul The Ultimate Battle Of Generations
- Burger And A Grape Snow Cone The Ultimate Combo You Didnt Know You Needed
Why Learning How to Wrap a Present Matters
Gift wrapping might seem like a small detail, but trust us—it makes a huge difference. A well-wrapped present not only shows thoughtfulness but also adds excitement for the recipient. Imagine handing over a gift that looks like it came straight out of a high-end boutique. Sounds impressive, right? Plus, wrapping gifts is a great way to express creativity and personalize the experience for your loved ones.
Here are a few reasons why learning how to wrap a present is worth your time:
- It shows you care about the presentation
- It enhances the overall gifting experience
- It’s a fun activity that can involve the whole family
- It allows you to add personal touches that make the gift unique
So whether you’re wrapping a small box or a large item, knowing how to do it right will leave a lasting impression on whoever receives it.
- How Many Seconds In A Day Lets Break It Down
- Sophie Rain Onlyfans The Ultimate Guide To Her Content Career And Success
Basic Materials You’ll Need
Before we get into the nitty-gritty of wrapping, let’s talk about the essentials. Having the right tools makes all the difference when it comes to achieving that polished look. Here’s what you’ll need:
- Wrapping paper (choose something that matches the occasion)
- Scissors (sharp ones work best)
- Double-sided tape or regular tape
- A ruler or straight edge (optional, but helpful)
- Gift tags and ribbons (for that extra flair)
Pro tip: Always measure your wrapping paper before cutting it. Too much paper can lead to unnecessary folds, while too little means you’ll have to start over. Finding the right balance is key!
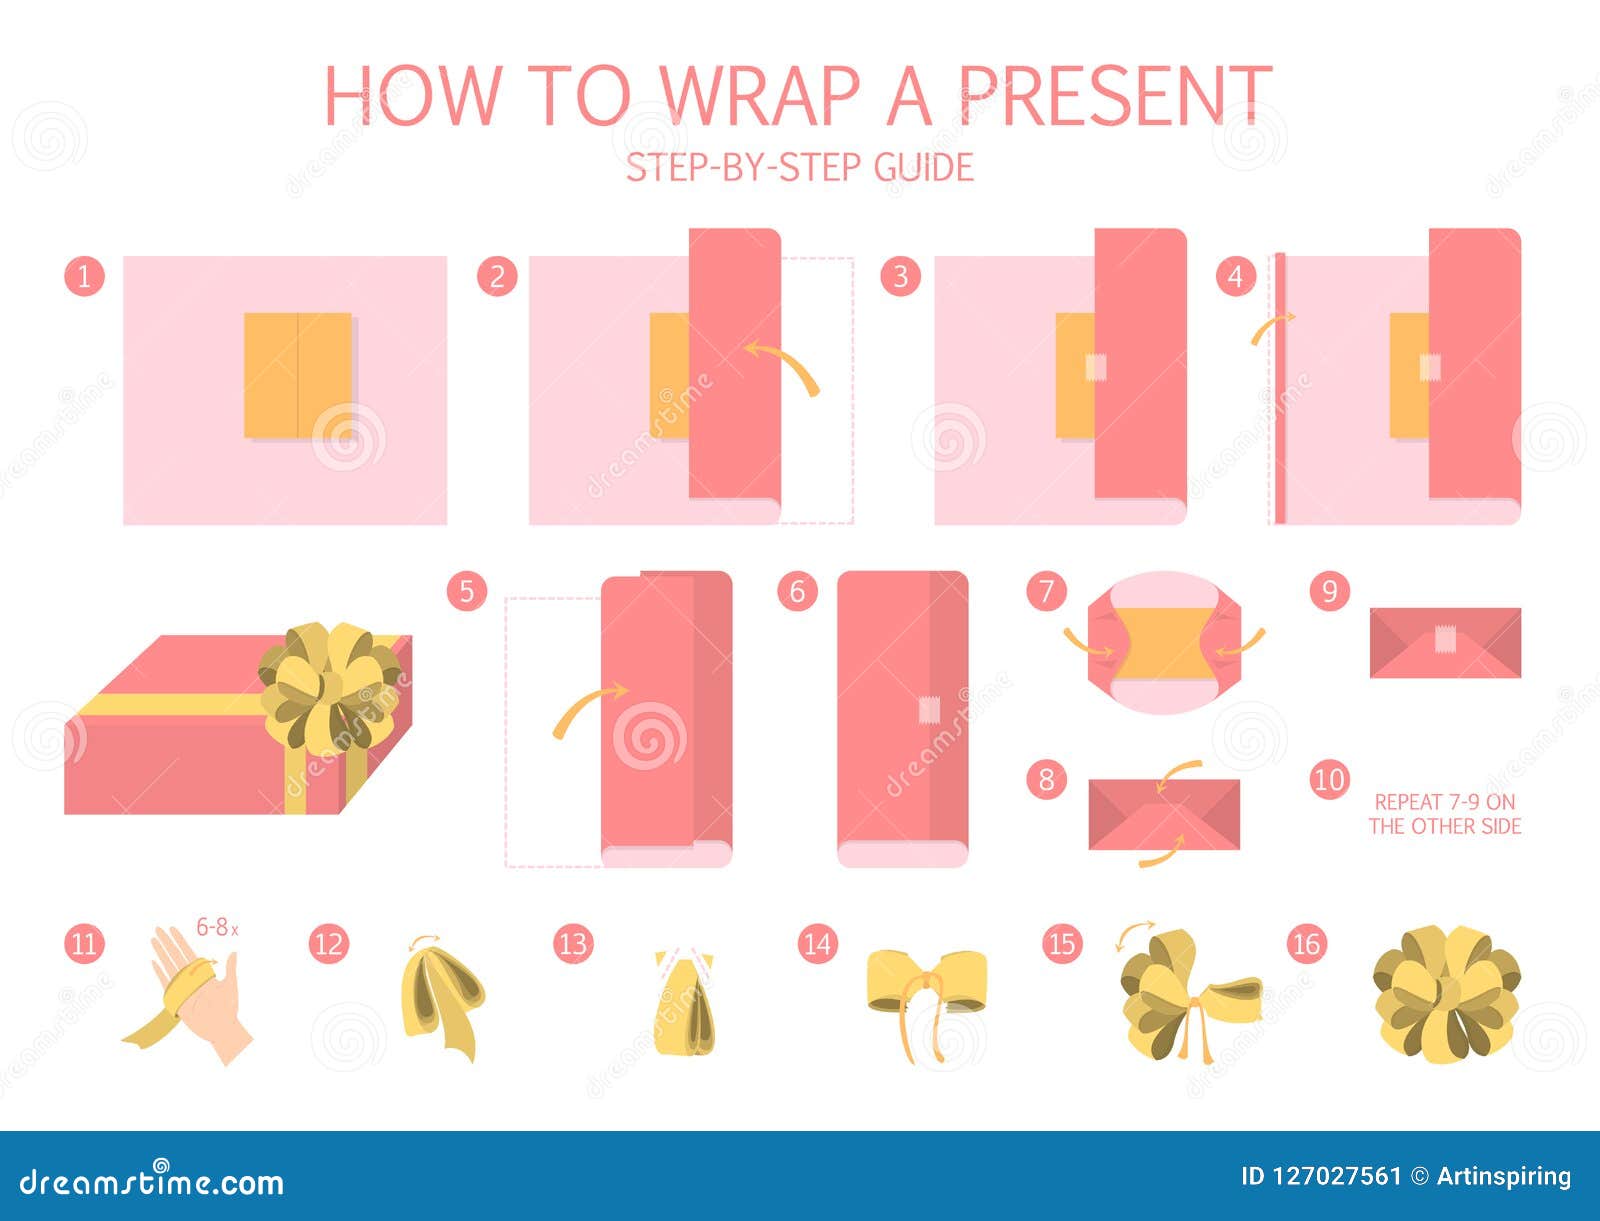
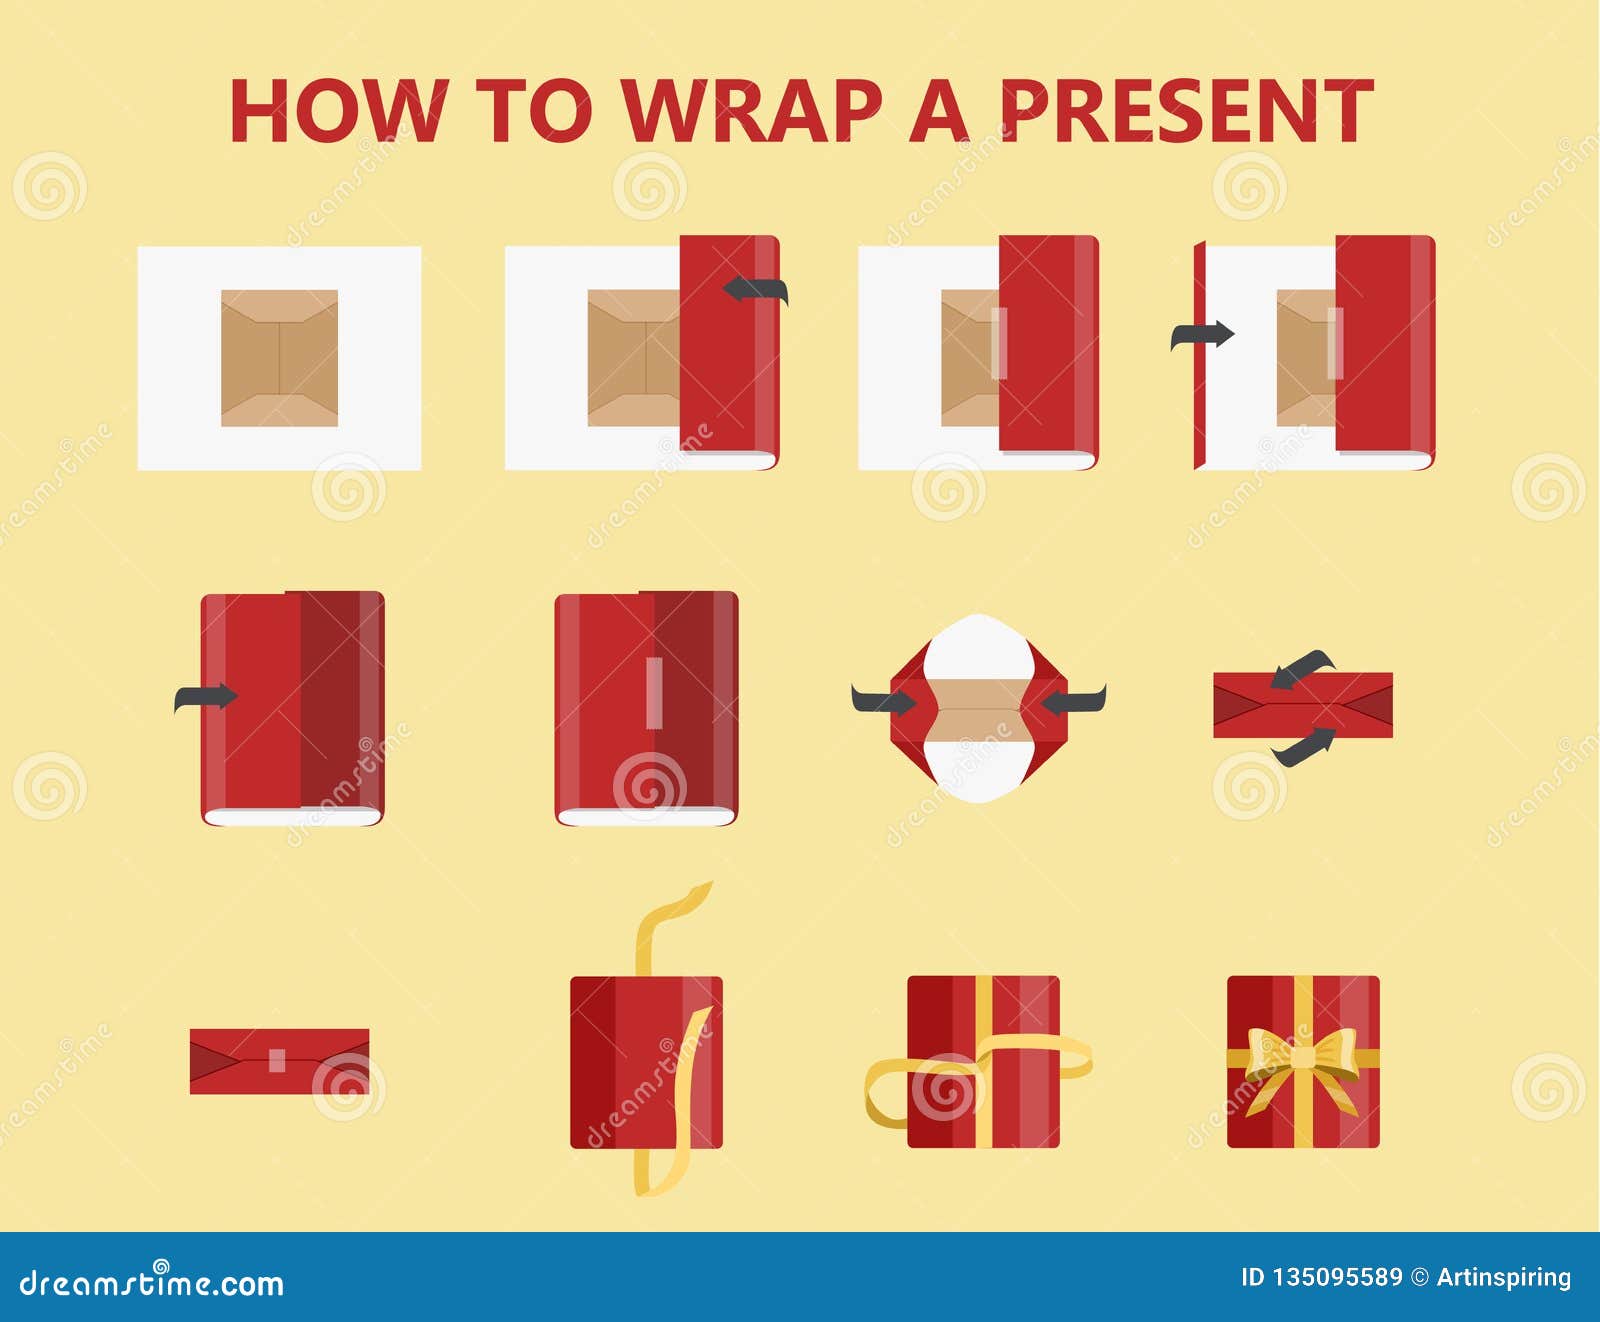
Step-by-Step Guide to Wrapping a Present
Now that you’ve got your materials ready, let’s walk through the process step by step. This method works for most standard boxes, so it’s a great starting point for beginners.
Step 1: Measure and cut your wrapping paper. Lay the gift box on the paper and make sure there’s enough excess on all sides. A good rule of thumb is to leave about 4-6 inches of extra paper on each side.
Step 2: Place the gift box in the center of the paper and fold one side over the top of the box. Use tape to secure it in place.
Step 3: Fold the other side over the first layer, creating a clean seam down the middle. Tape this side down as well.
Step 4: Move on to the ends. Fold the shorter side of the paper up like an envelope flap and tape it securely. Repeat on the opposite side.
Step 5: Finally, trim any excess paper and add decorative elements like bows or gift tags. And voila! Your present is ready to go.
Tips for Wrapping Irregularly Shaped Gifts
Not all gifts come in neatly shaped boxes, and that’s okay! Wrapping irregularly shaped items requires a bit more creativity, but it’s totally doable. Here are some tips:
- Use tissue paper or cellophane to wrap fragile items first
- Consider using gift bags for oddly shaped objects
- Experiment with different types of paper, such as kraft or patterned options
- Don’t be afraid to think outside the box—literally!
Remember, the goal is to make the gift look presentable, not perfect. Sometimes imperfections add character and charm.
Adding That Extra Touch
Once your gift is wrapped, it’s time to add those finishing touches that take it from good to great. Here are some ideas:
- Use colorful ribbons or bows to add visual interest
- Include personalized gift tags with heartfelt messages
- Try using washi tape for a modern twist
- Experiment with different textures, like burlap or lace
These little details can make a big impact, turning a simple gift into something truly memorable. Plus, they give you the chance to showcase your personality and creativity.
How to Tie a Perfect Bow
Tying a bow might sound intimidating, but it’s easier than you think. Follow these steps for a flawless finish:
Step 1: Cut a long piece of ribbon and lay it flat on your work surface.
Step 2: Make two loops with the ribbon, one on each side. Adjust the size of the loops until they’re equal.
Step 3: Tie the loops together in a knot, leaving the ends long enough to create tails.
Step 4: Fluff out the loops and adjust the tails for a polished look.
And just like that, you’ve got yourself a beautiful bow to top off your gift!
Common Mistakes to Avoid
Even the best gift wrappers make mistakes sometimes. Here are a few common pitfalls to watch out for:
- Using too much or too little paper
- Not securing the tape properly, leading to loose edges
- Overcomplicating the design with too many elements
- Skipping the measuring step, which can result in uneven folds
By keeping these tips in mind, you’ll avoid unnecessary headaches and ensure your gifts look their best.
Advanced Techniques for Pro Wrappers
If you’re ready to take your gift wrapping skills to the next level, here are some advanced techniques to try:
1. **Diagonal Wrapping**: Instead of wrapping the box horizontally or vertically, try wrapping it diagonally for a unique look.
2. **Layered Wrapping**: Use multiple layers of paper or fabric to create depth and texture.
3. **Origami-Inspired Designs**: Fold the paper into intricate patterns for a truly standout presentation.
4. **Custom Labels**: Design your own gift tags using stamps, markers, or even digital tools.
These techniques require a bit more practice, but they’re definitely worth the effort for special occasions.
DIY Gift Wrapping Ideas
Why stick to traditional wrapping paper when you can get creative? Here are some DIY gift wrapping ideas to inspire you:
- Use fabric scraps or old clothes as reusable wrapping material
- Create your own patterns using stencils and paint
- Wrap gifts in newspaper or comic strips for a fun, vintage vibe
- Decorate plain paper with stamps, stickers, or hand-drawn designs
DIY wrapping not only saves money but also adds a personal touch that recipients are sure to appreciate.
Gift Wrapping for Special Occasions
Different occasions call for different wrapping styles. Here’s how to adapt your approach based on the event:
Christmas Gift Wrapping
For Christmas, go all out with festive colors like red, green, and gold. Incorporate seasonal patterns and embellishments like snowflakes or pinecones. And don’t forget the Christmas bow!
Birthday Gift Wrapping
Birthday gifts should reflect the recipient’s personality. Use bright colors and playful designs for kids, and more sophisticated patterns for adults.
Wedding Gift Wrapping
Wedding gifts deserve elegant wrapping. Opt for neutral tones like white, ivory, or silver, and add touches of lace or satin ribbon for a luxurious feel.
By tailoring your wrapping style to the occasion, you’ll create gifts that truly stand out.
Conclusion: Wrapping Up the Art of Gift Wrapping
Gift wrapping doesn’t have to be daunting. With the right techniques and a bit of creativity, anyone can learn how to wrap a present like a pro. From basic methods to advanced tips, this guide has covered everything you need to know to make your gifts look amazing.
So next time you’re faced with the task of wrapping a present, remember these key points:
- Choose the right materials for the job
- Measure carefully before cutting
- Add personal touches to make the gift unique
- Don’t be afraid to experiment with new ideas
Now it’s your turn to put these tips into action! Share your gift wrapping experiences in the comments below, and don’t forget to check out our other articles for more inspiration. Happy wrapping! 🎁
Table of Contents
- Why Learning How to Wrap a Present Matters
- Basic Materials You’ll Need
- Step-by-Step Guide to Wrapping a Present
- Tips for Wrapping Irregularly Shaped Gifts
- Adding That Extra Touch
- How to Tie a Perfect Bow
- Common Mistakes to Avoid
- Advanced Techniques for Pro Wrappers
- DIY Gift Wrapping Ideas
- Gift Wrapping for Special Occasions
:strip_icc()/BetterHomesandGardens_Howtowrapchristmaspresentslikeapro_colorv3-31d28c233c534c67a884e62b4ef1265b.png)
Detail Author:
- Name : Bradly Labadie
- Username : rrau
- Email : khalid02@yahoo.com
- Birthdate : 1977-09-06
- Address : 9526 Macejkovic Ramp North Traceyshire, MA 54029-0862
- Phone : 907.369.2092
- Company : Buckridge-Jenkins
- Job : Insurance Appraiser
- Bio : Cupiditate natus laborum et ducimus. Porro fugit totam unde error incidunt. Sapiente illo hic ipsum dolores.
Socials
instagram:
- url : https://instagram.com/harvey.hayes
- username : harvey.hayes
- bio : Ex ipsam ut dolorum dolores sequi. Sequi quae et quos. Et non et non ea doloribus eos et.
- followers : 6310
- following : 1320
twitter:
- url : https://twitter.com/hayes1983
- username : hayes1983
- bio : Iste non modi dignissimos voluptatem sint. Ut eos est aut eum maxime.
- followers : 5501
- following : 1181
tiktok:
- url : https://tiktok.com/@hhayes
- username : hhayes
- bio : Et distinctio magni ut maiores omnis. Et id libero et.
- followers : 2976
- following : 1932
linkedin:
- url : https://linkedin.com/in/hayesh
- username : hayesh
- bio : Quas officia rem doloremque vero nostrum iure.
- followers : 3585
- following : 575
facebook:
- url : https://facebook.com/hayes1977
- username : hayes1977
- bio : Officia ipsa voluptatem doloribus rem aut. Sunt quo id numquam ullam quae sint.
- followers : 1158
- following : 311
