So here’s the thing, learning how to draw a turtle is not as hard as you might think it is. Like, seriously, turtles are one of the coolest creatures out there, and being able to sketch one can be super satisfying. Whether you’re a beginner or just looking to brush up on your skills, this guide has got you covered. Let’s dive in and make some art happen!
Art is all about expressing yourself, and drawing animals like turtles can be a great way to connect with nature. Think about it—turtles are these chill, slow-moving creatures that carry their homes on their backs. Drawing them can be a fun way to capture that essence and bring it to life on paper. Plus, who doesn’t love turtles, right?
Before we get started, let me tell you something important: you don’t need fancy tools or years of experience to create awesome turtle drawings. All you need is a pencil, some paper, and a willingness to try. And hey, if you mess up, that’s totally okay! Art is all about experimenting and having fun. So, are you ready to unleash your inner artist? Let’s go!
- Papi How You Know Im Dominican Exploring The Roots Culture And Identity
- Agatha Coven Of Chaos Episodes A Deep Dive Into Wandavisionrsquos Dark Spellbinding Storyline
Why Drawing Turtles Is So Popular
Turtles have been a favorite subject for artists for centuries, and it’s no surprise why. These creatures have a unique shape, with their shells, flippers, and those adorable little heads. Plus, they’re just so darn cute! Drawing turtles is not only fun but also a great way to practice your skills in shading, proportions, and texture. You can even experiment with different styles, like cartoonish or realistic.
Another reason turtles are so popular in art is because of their symbolic meaning. In many cultures, turtles represent patience, wisdom, and longevity. So, when you draw a turtle, you’re not just creating a picture—you’re also tapping into something deeper. It’s like giving your artwork a little extra soul.
What You’ll Need to Start
Alright, let’s talk supplies. You don’t need anything fancy to get started. Here’s a quick list of what you’ll need:
- Cant Buy Me Loving The Ultimate Guide To Love Relationships And Everything Inbetween
- Benny Blanco Produced Songs The Ultimate Guide To His Hitmaking Journey
- A pencil (HB or 2B works great)
- An eraser (preferably a soft one)
- Some paper (sketch paper is ideal, but regular printer paper works too)
- Optional: colored pencils, markers, or paints if you want to add some color
See? Super simple. You don’t need to break the bank to create beautiful art. Just grab what you’ve got and let’s get drawing!
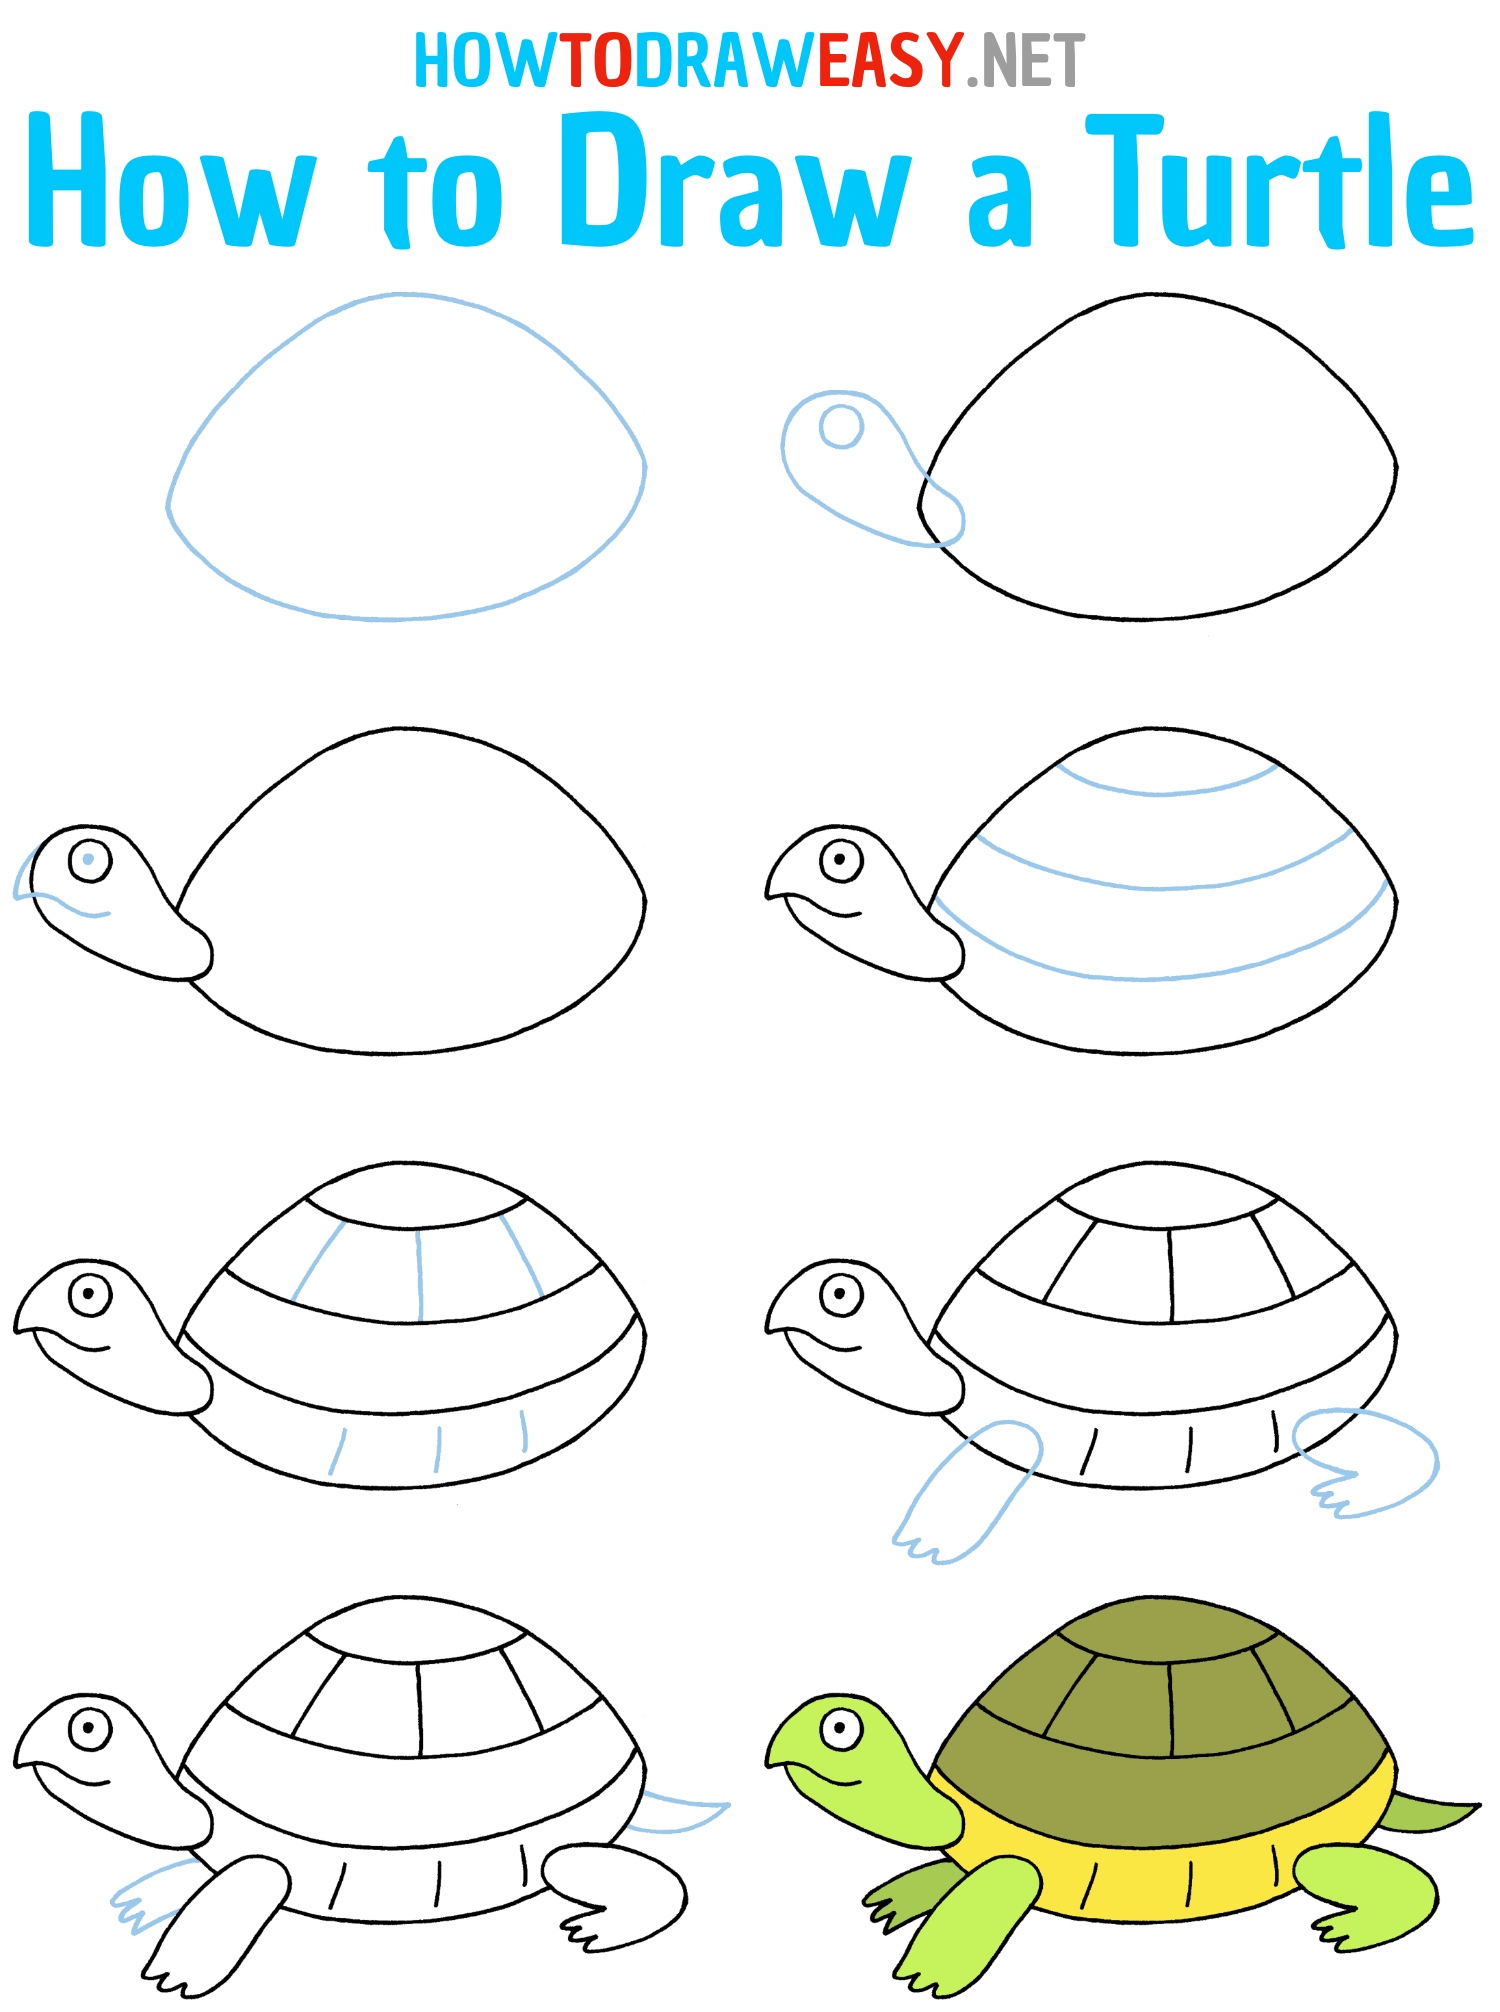
Step 1: Sketch the Basic Shape
The first step in learning how to draw a turtle is to sketch the basic shape. Start by drawing an oval for the body. This will serve as the foundation for your turtle’s shell. Don’t worry too much about perfection at this stage—just focus on getting the general shape down. Remember, art is all about process, not perfection!
Once you’ve got your oval, add a smaller circle for the head and four lines for the legs. These don’t have to be detailed yet—just rough outlines to give you a sense of where everything will go. Think of it like building a house—you need to lay the foundation before you can start adding the walls and roof.
Pro Tip: Keep It Loose
At this stage, it’s important to keep your hand loose and relaxed. Tight, rigid lines can make your drawing look stiff. Instead, try using light, flowing strokes to create a more natural look. And if you make a mistake, don’t sweat it! That’s what erasers are for.
Step 2: Add the Shell Details
Now that you’ve got the basic shape down, it’s time to add the shell details. Start by drawing the outline of the shell around the oval. Make sure it’s slightly larger than the oval, as the shell will cover the turtle’s body. Then, add the scutes—the hexagonal patterns that make up the shell. These can be as detailed or as simple as you like, depending on your style.
If you’re going for a realistic look, take some time to study reference photos of turtles. You’ll notice that the scutes aren’t perfectly uniform—they vary in size and shape. This adds character to your drawing and makes it look more lifelike.
Why Reference Photos Matter
Using reference photos is a great way to improve your drawing skills. It helps you understand the anatomy of the turtle and how its features interact with each other. Plus, it gives you ideas for different textures and patterns to incorporate into your artwork. So, don’t be afraid to use them—every great artist does!
Step 3: Draw the Head and Legs
With the shell in place, it’s time to focus on the head and legs. Start by refining the shape of the head. Turtles have small, pointed heads with large eyes, so make sure to capture that in your drawing. Add a mouth if you want, but keep it subtle—turtles aren’t exactly known for their big smiles.
Next, draw the legs. Turtles have four flippers, which are used for swimming and walking. Pay attention to the proportions—front legs are usually slightly larger than back legs. And don’t forget to add some webbing between the toes for that extra turtle charm!
Common Mistakes to Avoid
One common mistake beginners make is drawing the legs too big or too small. Remember, turtles are all about balance. Their legs should be proportional to their body and shell. Another mistake is forgetting to add the webbing between the toes. This small detail can make a big difference in how realistic your drawing looks.
Step 4: Add Texture and Shading
Texture and shading are what bring your drawing to life. Start by adding texture to the shell. Use small, curved lines to mimic the texture of the scutes. You can also add some cracks or imperfections to make it look more realistic. Remember, no turtle shell is perfect!
For shading, focus on creating depth and dimension. Use a darker pencil or marker to shade the areas where the light doesn’t hit, like under the shell or around the legs. This will give your drawing a three-dimensional look. And if you’re feeling adventurous, try experimenting with different shading techniques, like cross-hatching or stippling.
Shading Techniques to Try
Here are a few shading techniques you can try to enhance your turtle drawing:
- Hatching: Drawing parallel lines to create shading.
- Cross-hatching: Layering hatching lines in different directions.
- Stippling: Using dots to create shading and texture.
Experiment with these techniques to find what works best for you. Art is all about exploring and discovering new ways to express yourself!
Step 5: Add the Final Touches
Now that you’ve got the basic drawing down, it’s time to add the final touches. Go over your lines with a darker pencil or pen to make them stand out. Erase any unnecessary guidelines and refine the details. You can also add some color if you like—turtles come in a variety of shades, from green to brown to even bright blue!
Don’t forget to sign your masterpiece! Adding your signature is a great way to take ownership of your work and show the world what you’ve created. Who knows? Maybe one day your turtle drawing will be hanging in a gallery somewhere!
How to Make Your Drawing Stand Out
There are a few things you can do to make your turtle drawing stand out from the rest. First, pay attention to the background. Adding a simple background, like water or sand, can really enhance your drawing and give it context. Second, experiment with different perspectives. Drawing a turtle from different angles can make your artwork more dynamic and interesting.
Tips for Beginners
If you’re new to drawing turtles, here are a few tips to help you get started:
- Start with simple shapes and build from there.
- Use reference photos to understand turtle anatomy.
- Don’t be afraid to make mistakes—they’re part of the learning process!
- Practice regularly to improve your skills.
Remember, drawing is a skill that takes time and practice to master. So, don’t get discouraged if your first few attempts don’t turn out exactly how you envisioned. Every great artist started out as a beginner—just keep practicing and you’ll get there!
Conclusion: Keep Practicing and Have Fun
Learning how to draw a turtle is a fun and rewarding experience. By following these steps and tips, you’ll be well on your way to creating beautiful turtle drawings that capture their unique charm and character. Remember, art is all about expressing yourself and having fun, so don’t be afraid to experiment and try new things.
So, what are you waiting for? Grab your pencil and paper and start drawing! And when you’re done, don’t forget to share your masterpiece with the world. Who knows? You might inspire someone else to pick up a pencil and start drawing too. Happy creating!
Table of Contents
- Why Drawing Turtles Is So Popular
- What You’ll Need to Start
- Step 1: Sketch the Basic Shape
- Step 2: Add the Shell Details
- Step 3: Draw the Head and Legs
- Step 4: Add Texture and Shading
- Step 5: Add the Final Touches
- Tips for Beginners
- Conclusion: Keep Practicing and Have Fun


Detail Author:
- Name : Jaden Blick PhD
- Username : kim28
- Email : pgerlach@homenick.com
- Birthdate : 1999-09-07
- Address : 509 Gayle Isle Apt. 041 South Fabianbury, MT 65273
- Phone : 660.969.6216
- Company : Stehr PLC
- Job : Geography Teacher
- Bio : Dolore aut iure ut in natus repudiandae. Saepe repellat illo minus ab temporibus deserunt. Rem nihil et optio eligendi et. Amet ratione et tempore rerum expedita libero.
Socials
tiktok:
- url : https://tiktok.com/@dameon_real
- username : dameon_real
- bio : Consequuntur officiis illum et perspiciatis aut tenetur nihil.
- followers : 2322
- following : 1179
twitter:
- url : https://twitter.com/spinka2016
- username : spinka2016
- bio : Cumque labore dolorem ipsam. Mollitia qui temporibus repellat temporibus magni et. Inventore reprehenderit error ut pariatur exercitationem neque.
- followers : 1373
- following : 521
instagram:
- url : https://instagram.com/dameon.spinka
- username : dameon.spinka
- bio : Quod facere earum distinctio quas. Ea sunt nam error omnis.
- followers : 994
- following : 2610
