So, you wanna know how to draw a rose? Well, let me tell ya, roses are not just some fancy flowers for bouquets—they’re like little masterpieces waiting to be created on paper. Drawing roses might seem intimidating at first, but trust me, with the right guidance and practice, you can make your pencil dance across the page like it’s meant to be. Whether you’re a total beginner or someone who’s been sketching for years, this guide will take you through every step to help you create a stunning rose drawing. So grab your pencils, erasers, and let’s get started!
Now, before we dive into all the juicy details, let’s talk about why learning how to draw a rose is such a big deal. Roses are more than just pretty flowers—they’re symbols of love, beauty, and passion. And when you learn to draw one, you’re not just creating art; you’re capturing emotion and meaning in every stroke. So whether you’re planning to gift your artwork to someone special or just want to impress yourself, mastering the art of rose drawing is totally worth it.
But hey, don’t stress if you’re not Picasso yet. The beauty of drawing is that it’s all about practice and patience. This guide is designed to break down the process into manageable steps, so even if you’ve never picked up a pencil before, you’ll walk away with a beautiful rose sketch. Sound good? Let’s go!
- Bonnie Blue World Record Video The Ultimate Story Behind The Phenomenon
- Sabrina Carpenter Yellow Dress A Fashion Moment That Stole The Spotlight
Table of Contents:
- Introduction to Drawing Roses
- Tools You’ll Need
- Start with Basic Shapes
- Understanding Rose Petals
- Adding Leaves and Stems
- Shading Techniques for Depth
- Different Styles of Rose Drawings
- Common Mistakes to Avoid
- Practice Makes Perfect
- Pro Tips for Stunning Roses
Introduction to Drawing Roses
Why Drawing Roses is an Art Form
Drawing a rose isn’t just about copying what you see. It’s about understanding the intricate details of its structure and bringing them to life on paper. Every petal, every curve, and every shadow tells a story. That’s why so many artists are drawn to roses—they’re challenging yet rewarding. Plus, there’s something magical about transforming a blank sheet of paper into a vibrant, lifelike flower.
If you’re new to drawing, don’t worry. You don’t need to be an expert to start. In fact, the best part of art is that it’s a journey. Each stroke you make is a step toward improvement. So, whether you’re aiming for realism or something more abstract, roses are a great subject to practice your skills.
- Dog Closing Eyes Meme The Ultimate Guide To The Viral Sensation
- Jenna Lyons A Fashion Icon Who Redefined Style
Tools You’ll Need
Before you start sketching, it’s important to gather the right tools. Here’s a quick list of everything you’ll need:
- Pencils (HB, 2B, 4B, 6B)
- Eraser (both kneaded and regular)
- Sketchbook or drawing paper
- Blending tools (tortillons or blending stumps)
- Reference images (optional but highly recommended)
While you can use any pencil, having a range of grades will give you more control over shading and detail. And don’t forget your eraser—it’s your best friend when things go wrong!
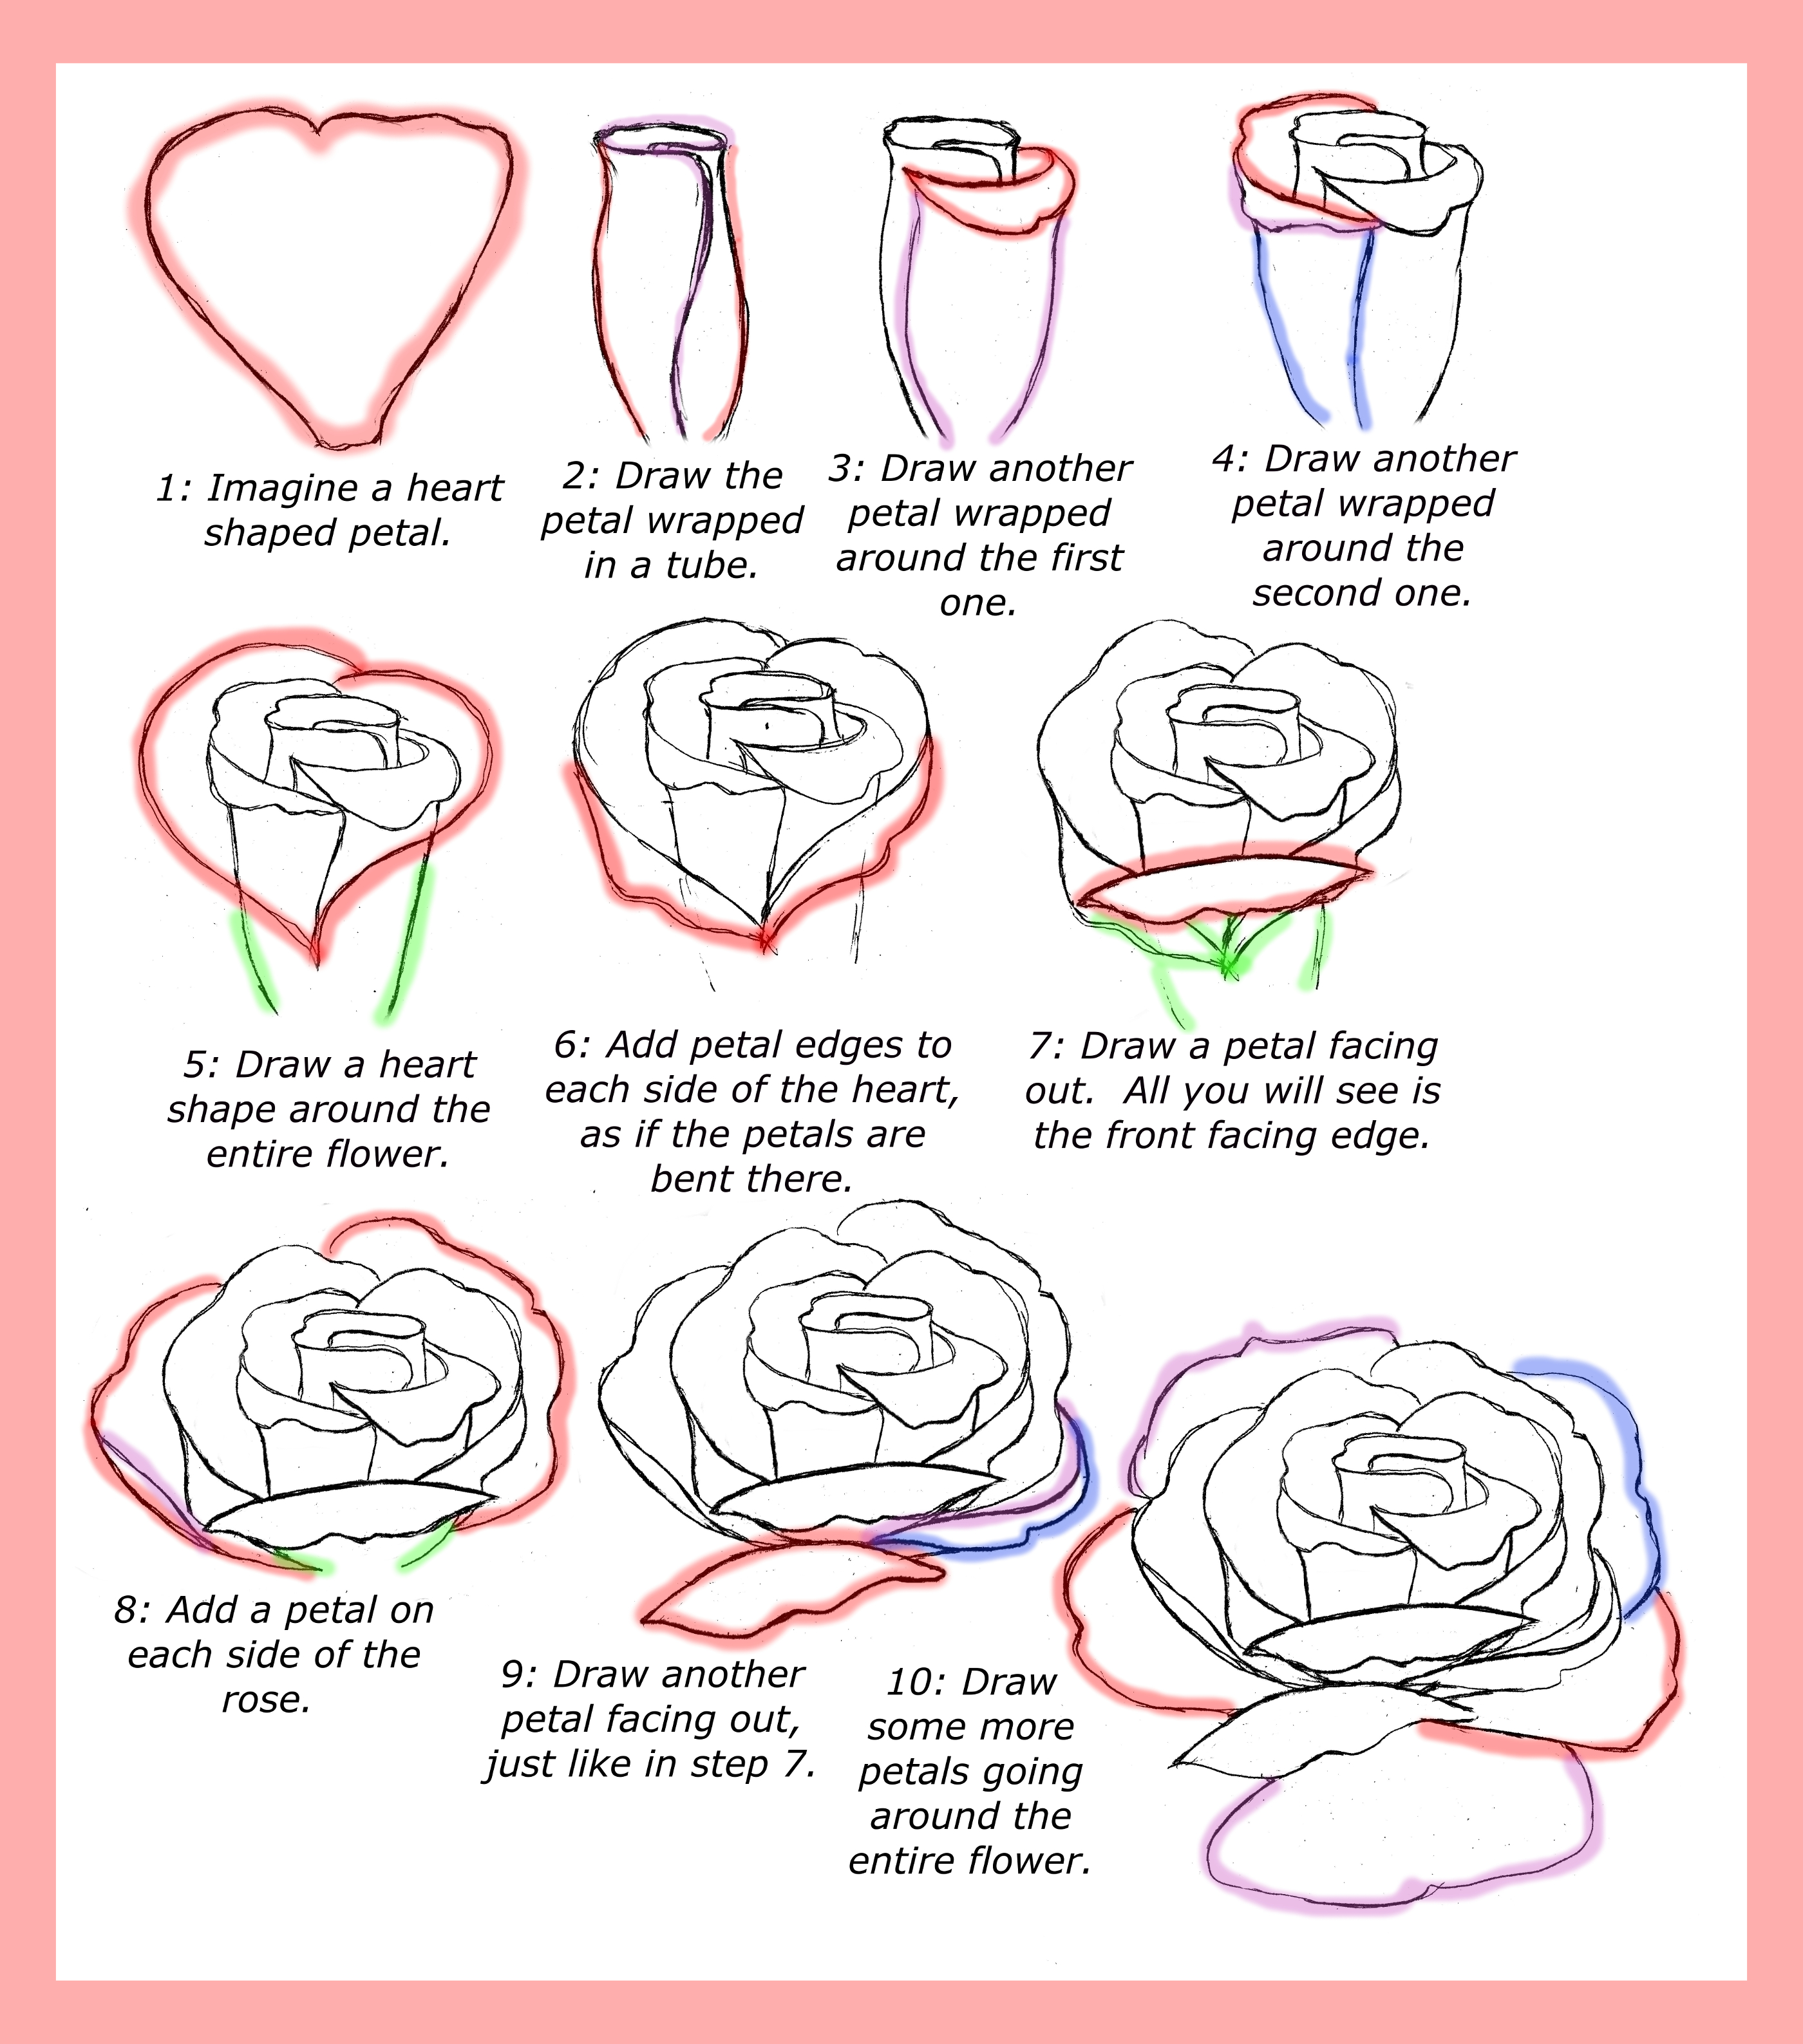
Start with Basic Shapes
Building the Foundation of Your Rose
One of the easiest ways to start drawing a rose is by breaking it down into basic shapes. Think circles, ovals, and teardrops. These shapes form the foundation of your flower and help you establish its overall structure.
Begin with a small circle in the center for the bud. Then, add larger, overlapping ovals around it to represent the petals. Keep adding layers until you have the desired size and shape. This method makes the process much less overwhelming and gives you a clear roadmap to follow.
Understanding Rose Petals
Rose petals are the stars of the show, so it’s crucial to understand their anatomy. Each petal has a unique shape, with a curved edge and a pointed tip. They also overlap in a specific way, creating a spiral pattern that adds depth and dimension to your drawing.
Here’s a tip: start by sketching the inner petals first. These are usually smaller and more tightly packed. As you move outward, the petals get larger and more spread out. Pay attention to how they curl and fold, as this will make your rose look more realistic.
Adding Leaves and Stems
Giving Your Rose Some Greenery
No rose is complete without its leaves and stem. These elements add balance and context to your drawing. Start by sketching the stem as a long, curved line. Then, add the leaves using teardrop shapes with jagged edges. Remember, leaves aren’t perfectly symmetrical, so embrace their imperfections.
Don’t forget the thorns! They’re an iconic feature of roses and can add texture to your drawing. Place them along the stem at irregular intervals for a natural look.
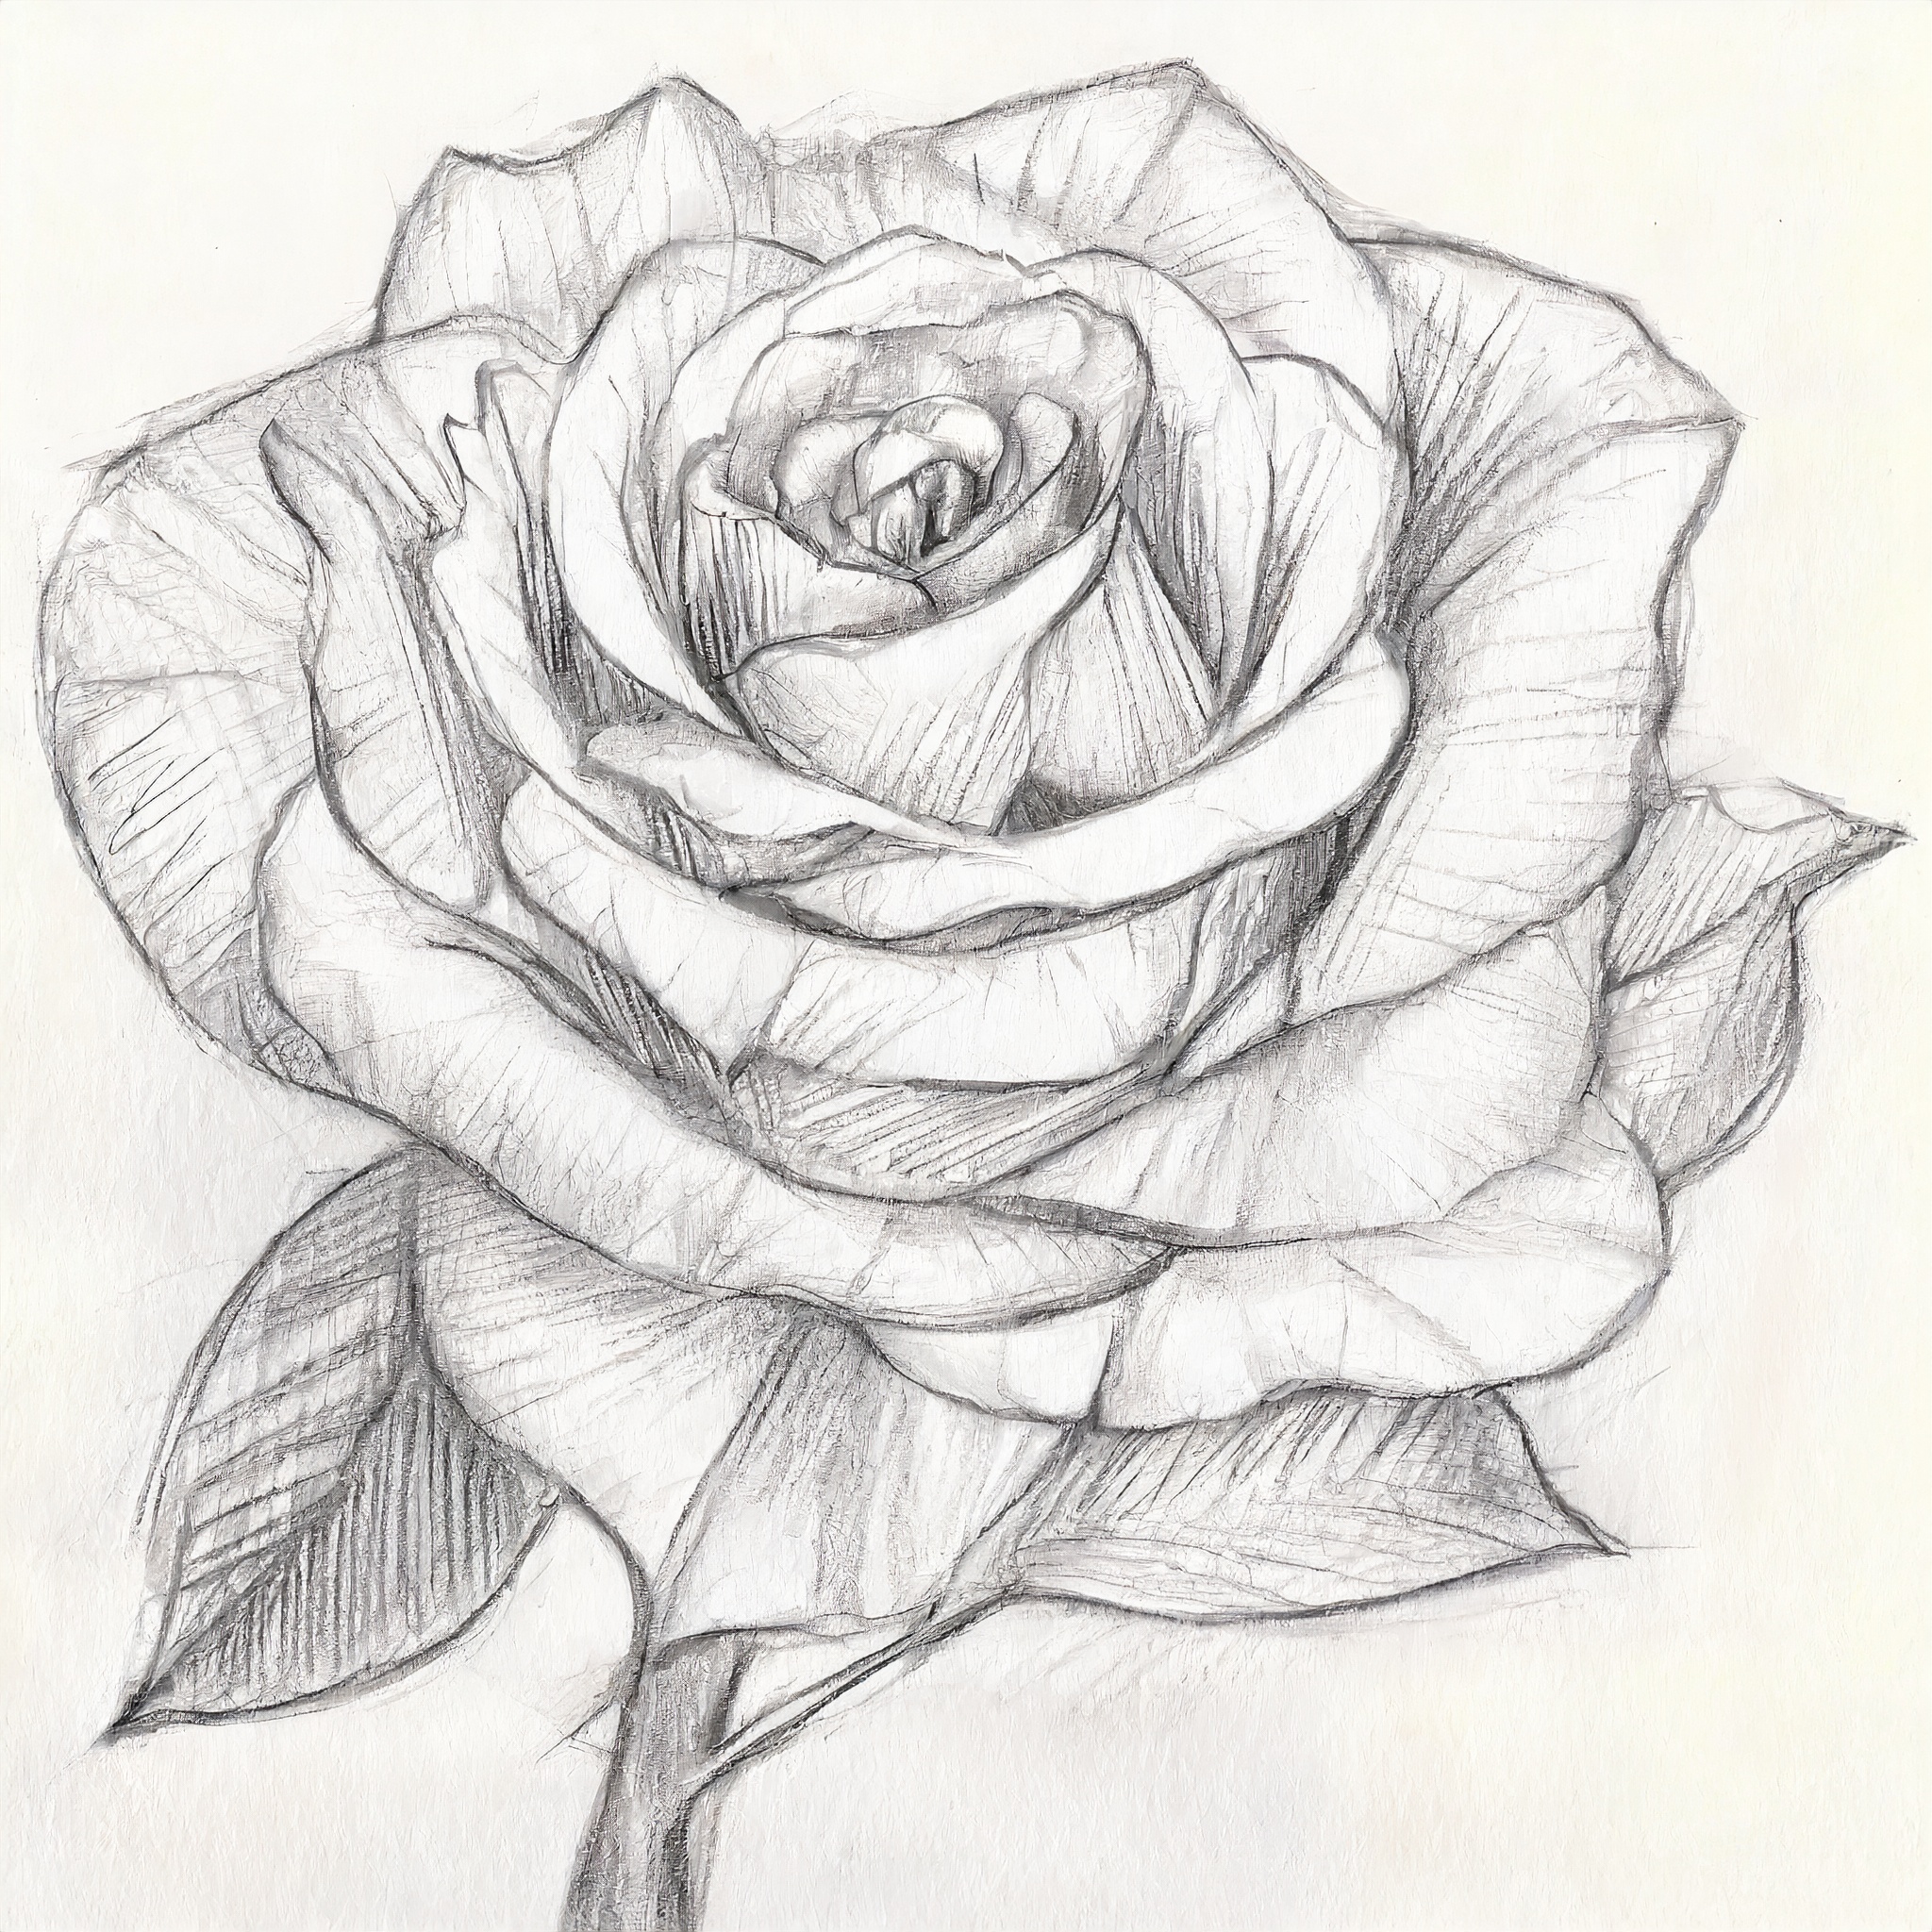
Shading Techniques for Depth
Shading is what brings your rose to life. It adds dimension, making your drawing look three-dimensional instead of flat. There are several shading techniques you can use, including hatching, cross-hatching, stippling, and blending.
For roses, blending is often the most effective technique. Use a blending tool to soften the edges of your shading and create smooth transitions between light and dark areas. Focus on the areas where the petals overlap, as these are where the shadows naturally occur.
Different Styles of Rose Drawings
From Realism to Abstract
One of the coolest things about drawing roses is that you can experiment with different styles. If you’re into realism, aim for as much detail as possible. Study reference images to capture every curve and shadow. On the other hand, if you prefer something more abstract, feel free to simplify the shapes and focus on the overall composition.
Watercolor roses, ink sketches, and digital art are all great options to explore. Each style offers its own set of challenges and rewards, so don’t be afraid to try new things.
Common Mistakes to Avoid
Even the best artists make mistakes, but being aware of them can help you improve faster. Here are a few common pitfalls to watch out for:
- Making all the petals the same size and shape
- Forgetting to add shadows and highlights
- Overworking certain areas and losing detail
- Ignoring the stem and leaves
Remember, practice is key. Every mistake is a learning opportunity, so don’t get discouraged if your first attempts don’t turn out perfectly.
Practice Makes Perfect
Like any skill, drawing roses takes practice. The more you do it, the better you’ll get. Set aside time each day to sketch, even if it’s just for a few minutes. Experiment with different techniques and styles, and don’t be afraid to step out of your comfort zone.
And hey, don’t forget to have fun! Art is supposed to be enjoyable, so let your creativity flow and see where it takes you. Who knows, you might just discover a new passion along the way.
Pro Tips for Stunning Roses
Here are a few final tips to help you take your rose drawings to the next level:
- Use reference images to study the anatomy of roses
- Practice sketching from different angles
- Experiment with different shading techniques
- Pay attention to the details, but don’t get too caught up in perfection
- Share your work with others for feedback and encouragement
With these tips in mind, you’ll be well on your way to creating beautiful, lifelike rose drawings. So keep practicing, keep exploring, and most importantly, keep drawing!
Conclusion
Learning how to draw a rose is a journey that combines skill, patience, and creativity. From understanding the basics of shape and structure to mastering shading and detail, every step brings you closer to creating something truly special. Remember, art is all about growth, so don’t be afraid to make mistakes and learn from them.
Now that you’ve got all the tools and tips you need, it’s time to put them into action. Grab your pencils, find a quiet spot, and let your imagination run wild. Who knows, you might just create something so beautiful it takes your breath away. And when you’re done, don’t forget to share your masterpiece with the world. After all, art is meant to be seen and appreciated.
So, what are you waiting for? Get drawing and show the world how amazing you can be!

Detail Author:
- Name : Prof. Mia Gorczany
- Username : zcruickshank
- Email : wsmitham@goldner.info
- Birthdate : 1975-01-09
- Address : 3902 Reece Coves Lake Beauside, VA 67599
- Phone : 1-801-407-2423
- Company : Senger, Parisian and Considine
- Job : Telecommunications Equipment Installer
- Bio : Ex sequi ipsa est beatae dicta. Voluptatem sint non error delectus eos ea maxime consequatur. Eligendi itaque quo officia voluptatum atque velit eaque.
Socials
instagram:
- url : https://instagram.com/dejuan.zulauf
- username : dejuan.zulauf
- bio : Sed et ad et aliquam. Eum commodi et ut deleniti. Quisquam similique et nihil voluptatem.
- followers : 1641
- following : 650
linkedin:
- url : https://linkedin.com/in/dzulauf
- username : dzulauf
- bio : Qui dolore laudantium odit voluptatibus sunt.
- followers : 1222
- following : 1515
tiktok:
- url : https://tiktok.com/@dejuan.zulauf
- username : dejuan.zulauf
- bio : Exercitationem vitae laborum ut dolores ratione. Ut natus sint porro vel.
- followers : 4409
- following : 2609
